

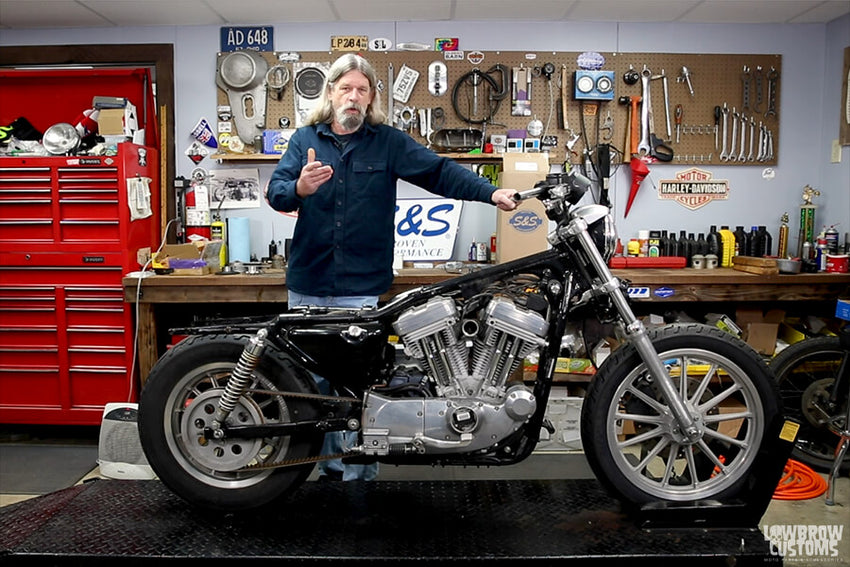
How to Disassemble Harley-Davidson Sportster 883cc Engine
In this 4-part video series from Lowbrow Customs, Todd walks you through the disassembly of a 2003 Harley-Davidson Sportster 883cc engine in preparation for installing a S&S Cycles Hooligan 1200cc conversion kit with oversized cams.
S&S makes Hooligan kits for converting 883 Sportsters to 1200cc, as well as 1200 to 1250cc. In addition to the larger displacement, the included cams and tappets drastically increase horsepower, all while using stock heads, pushrods, and fuel system.
These kits work on 2000-2021 Harley-Davidson Sportsters and can be installed on your motor within a day spent in the garage. They come in Silver or Black. So, break out the tool box and follow along.
VIDEO: S&S Cycles Hooligan 1200cc Conversion Kit How-To Part 1 - Disassembly
"There's no big mystery going on in there!" This step by step does not skip anything, and will help you understand how easy it is to break down your motor and add some real horsepower to it.
NOTE: If you just want to install a Sportster Big Bore Conversion Kit, you can follow along with this same video series and just disregard the section on removing your stock cams!
Let’s begin the work:
Step 1: Taking The Top Engine Apart
Before we get started taking the engine top of the engine apart, we're going to do the rocker boxes, cylinder heads. Cylinders first.
There's a couple things like you'll see as we go along here, a ring compressor. It's kind of important, and a torque wrench. Generally, if you don't have a torque wrench, you can borrow one from the auto parts store but I'm going to show you that this job isn't super hard.
You just have to pay attention to detail, cleaning things, gasket surfaces, and it's a pretty straightforward job. If you have some mechanical abilities, you should be able to handle this job with no problems.
Even if you're not super mechanically inclined and you just want to learn, it's not a hard engine to work on, or you just have to pay attention to what you're doing and get it done correctly and it'll work fine.
Step 2: Removing The Gas Tank
Most of the stuff's pretty straightforward. You're going to be removing the gas tank, the exhaust, the carburetor and then it gives you a nice clear shot to get to the top of the motor.
We're also going to go ahead and move the coil out of the way because obviously we can't get that front rocker box lid off.
When we get to the rear one, you'll see how much fun it is to get the stupid thing out of there. It's kind of a tight fit, but it will come out without removing the engine off. All these jobs we're doing here today can be done without removing the engine from the frame, which makes life a lot easier.
Let's go ahead and we'll get this coil moved out of the way here. The front tank bolt is what holds that. You're just going to get it out of there any way you can like so and I don't really want to disconnect everything. I am going to disconnect this, because it's going to need to come off anyway.
There we go. We're going to go ahead and remove this one. Spark plug wire. Now we have clear access. There's going to be eight bolts on the rocker boxes, four on the front, four on the rear. We're going to break those free and then we'll remove them, and for the lid you don't really need to worry about unloading anything.
Step 3: Removing The Spark Plugs & Pushrods
When we get down to the inner, lower rocker box, you'll see that we are going to remove the spark plugs and rotate the engine so that it's not putting pressure on the pushrods.
I've always liked to break these free by hand.
Then I'm going to grab my air ratchet, and you can see that this rear one is kind of hidden. You can't really get on it. Since my air ratchet's really not going to get down in there with this one, we'll go ahead and just remove that one all the way.
As we go along here, what I do is I'll set these fasteners on the workbench and then when I get the stuff apart I'll stick it back in the hole where it belongs.
These are pretty self explanatory, not a problem. Let's switch over to some air, that'll make things move a little more quickly. Let's go the other way. Quarter inch air ratchet and you may also notice I have this nifty little short Allen, which makes it pretty good too.
Under no circumstances are we going to be using a screwdriver to remove, to pry in between these gasket surfaces because that's no good.
Okay. Once we get all those out, I generally break the rocker free like so. That one's really stuck and so is that, this one will come off all in one lump sum, but this one will not. We're going to have to get that broke there.
Now, this is the one that's kind of a bear. You just got to hold your mouth just right.
Once you get it just right and you're holding your mouth just right, she will come off. It is a pain, so don't be alarmed if you're having a hard time getting that off.
Even I have a hard time getting that one off, along with the center. Like I said, I'm putting everything on the bench. All the rear will be here.
All the front will be over here. As you can see, now we're down to the rocker box where we're going to take some more bolts out. We might as well go ahead and tear these gaskets off of here right now, all we can.
We will be replacing all the gaskets. We're not reusing any gaskets. Now comes the time where we're going to go ahead and remove the spark plugs because we're going to be rotating the engine so that there's not a bunch of pressure on the pushrods.
I went ahead and loosen the spark plugs and those look like they were in need of replacement anyway. I've got a flat jack underneath the engine so I can jack up the back wheel.
There we go. We're going to go ahead and put it in second gear. If it won't go into gear you can just easily, you can bump the wheel. That'll make it go into gear. Go ahead and we'll do the rear one first.
Keep an eye on those rockers and watch what happens when I rotate it.
That one's starting to come up. It's coming up, it just went down and the other one's down. We'll go around one more time. That one came up.
Now, it's down. Now, both the rockers are down at their lowest point, so it's okay to go ahead and loosen this. There still will be some pressure on it, but not as much as if one was up and one was down.
Once again, we've got two, 3/16's right here. I like to take the little ones out first there. At least loosen these.
There's that lovely smell. Smells like you're at the fish market. When you get the top of one of these motors open, it's pretty awesome.
Now that we've broken it free, we should be able to use our ball end on there. Now that we've broken it free we should be able to use our ball end on there. We went ahead and loosened that with the ball end, and we've got the other one, and since these are longer than the top ones we can go ahead and take those out. We're going to need a 7/16 socket.
We're going to need two of them, and you're going to need a deep one for right there.
There's three small fasteners that will need to come out. These are pretty long. This is a long winded operation on these, and I don't really want to put my air ratchet in there because it'll probably get stuck in the middle of the damn frame- the darn frame.
Sometimes when you get them loose like that you can finish turning them out with your fingers, look at that.
That one would have worked for the air ratchet but since we're already on a roll here- and we'll show you again once we get this rocker box off all the fasteners. That one fell out, that's all right. Not a big deal, there's no place for it to go. It can't fall in anything that's going to hurt anything. We'll get it with a magnet in a sec here. We will be using the air ratchet on the front one though, because this is taking way too long. Oh my gosh, if I was working flat rate I'd be broke right now.
Nope, still not done. It's getting there. You can see, I'll show you one of these bolts, they have some weird corrosion on them, because you have a steel bolt and aluminum and that makes life a little more difficult here.
There it goes, got that one all the way. Let's grab a magnet and get that one out before we forget about it. There's that funky corrosion I was talking about, totally normal. Stuff looks like that.
Don't be concerned about it. You can see why I'm breaking these by hand because we probably have a bunch of corrosion on these two, and if I were to use my air tool it wouldn't break them. I'd still have to do it by hand. It's pretty obvious, top end's never been off this engine for a gasket leak.
This one will give us a little more leverage because it's longer. There she goes, look at her. Well, let's continue like this, by the time we get the air ratchet going we'll use that on the front one.
We're just about there, gang. There we go, ready to pull it off. I'm going to take these two bolts out so they don't collide with the frame. I'm also going to pull the pushrods out now.
Those will be in the way on the rear one, and then she should come out like so. Bada-bing, okay. Like I said, I like to stack up my parts so they all go back in the same place they came off. Generally we'll clean this stuff up later.
Just to review, we took these two out first, oh boy that's really-- Took those two out first then those three smaller ones in the middle, and then the four outer ones and then she comes off like so.
We're going to move on to the front one. It's going to be a lot easier because everything is much easier to get to. Once again, we're going to loosen the two. Let’s take a 7/16 first. One on the front and one on the rear, and we'll go ahead and loosen our 7/16.
Wait a minute, gang, we forgot to rotate the engine. Not a big deal since we haven't loosened the middle ones yet, but let's rotate her to the correct position.
I lowered it back down, gang, because the bike wasn't stable because I only have one tie down. That one's going up. There we go. That's it right there. Since we're done with that job I'm going to go ahead and put it back in neutral.
Step 4: Removing The Cylinder Heads
All right, we got our rockers in the right place. I'll switch to my air ratchet, trying to make things go a little faster here. That one fell out just like the other one, imagine that.
We are ready to loosen the other ones now. Really doesn't matter what order you do these in, breaking the torque on them.
You hear that? That's not to be alarming and then if you ratchet them until they feel like they are lost you can put the air on it. That's it for that one. She's all ready to come off. Look at that. That's all there is to that. Get that one. You may also take notice now how the pushrods have a colored band on them.
Pink and brown. Brown is going to be intake. Pink is going to be exhaust. All right, we are now ready to remove the cylinder heads. Well, you may notice we've got a head stay connected to the frame here, but we have already removed the bolts for it. In order to break the head bolts free a breaker bar is required.
Also make a kind of a weird shape that goes like this where you put your socket on it and- you just basically need some leverage. You're also going to need a 12 point socket for this.
I didn't mention it but I was using a six point socket on the other ones. I like to use six point sockets any chance I get because there's less chance of rounding off a fastener. Even though the spike isn't very new, stuff seems to be in pretty good shape.
Once again, it's never been apart. We'll go ahead and we'll break the four and four head bolts loose and then we'll be able to remove the cylinder heads.
Hear that noise? That means she broke free. Hear that. I suppose you could do it without an extension but it definitely makes a difference.
Once they're loose, they come out pretty easy. That initial breaking them free. We'll go ahead and break the other ones. We'll do all eight of them at once and then just pop them out.
Okay, oh wait a minute gang, we have neglected to remove our intake manifold. Take a look right here. You can see there's two half inch fasteners. Here and here. Incidentally you don't really need to remove these completely because, you'll see in a second here.
Those are pretty easy to remove because you're using a wrench, the other ones- sometimes the corrosion that occurs on these bolts can make it rather difficult to get them out.
This is where the tool I showed you comes in handy. A regular Allen wrench is too long to get into those.
Right, we went ahead and loosened those with a special tool and then you can use a ball end to get them out the rest of the way, because these do have to come all the way out. Then once I pull the manifold you'll see, and these surprisingly loosened very easily.
Sometimes these can really be a bear. Then you're just going to- probably would have helped if I loosened the other ones a little more. She'll come right out just like that. Think this one was kind of mucking it up a little.
We're going to be putting new intake manifold seals on here. Now you can see why you didn't have to take the other ones completely off because it's slotted and that one's solid.
Allen's head goes on that side, the other two are still on the cylinder heads. We'll put that aside for later.
Now we can go ahead and remove all of our head bolts, because we've broken them all free. I just use an extension with a knurling on it. If you want to use the air ratchet, you can do that too. Two more to go and then we'll have a couple of cylinder heads sitting on the workbench in a second here.
That one's a little too tight to do by hand. There it is. That one's a little extra corroded. Even though it feels loose, it doesn't want to turn by hand so if all else fails use your ratchet. There we go, cylinder heads. Pushrod tubes are coming off too.
Sometimes they stay in the bottom, sometimes they don't. One stayed in, one did not. We're probably not going to be able to break this free with this silly stay going on to the frame so we'll just go ahead and pop that off. It's going to have one stud and one bolt. Oh, there she goes. Look at her go.
Yes, I knew I should have taken that off earlier but I didn't, so we did now. It's all good. Now we're down to the cylinders. Look at that. So far, nothing overly complicated going on here, is there? Well, pistons are in a good place to take the cylinders off. They're both almost all the way up so that's a good thing.
We're just going to go ahead and wiggle it off. Probably actually would have been better if it was down. There you go, that's better.
I'm just supporting the rod with my other hand, so it doesn't want to rotate again like it just did. Come on. There she goes.
Okay. Now, next thing we're going to want to do, we're going to put some of these blue shop towels in that hole. Both those holes, we don't want anything going in there. If one of these stray bolts laying around here goes in there, that could be a problem.
Step 5: Removing The Circlips from Piston Pins
Okay, now we're going to go ahead and remove the circlips from the piston pins. There's a little groove here. Just take a screwdriver or a pick and should pop out.
There she goes, bada-bang. Then the pin should just slide right out, like so. Pull it out enough to clear the rod and remove your piston. This one we took out the other side, so we're going to push this way, like that.
Step 6: Removing The Pushrod Tube Holders
All right. Since the SNS Hooligan kit comes with a new set of cams and lifters, we're going to go ahead and remove the pushrod tube holders.
Even if we were just doing a top-end, just a 1200 big bar with no cams, we'd still need to remove these to replace the seals in there. We'll go ahead and break those free and then you can see what the seals look like that are on the bottom of the pushrod tubes.
Once again they are torqued so I'm using a long ratchet to give me some leverage. Once again, we've got that same old corrosion going on. I don't know that they broke free. I think I'll switch to a short ratchet.
Step 7: Removing The Lifters
In order to get the lifters out, you have to take these four fasteners here, and you'll see when we get one out, it's kind of a pin. You'll see. Let's get one out and then you'll see. Let's get her done, 5/32. I'll just do one all the way so you can see what's- what we're working with here.
Look at that, and what that does, you'll see when I pull a lift or there's a flat on the lifter. This pin going in the hole is keeping the lifter from spinning around, because if the lifter could spin around the roller that goes against the cam, well that'd be a big problem.
I'll go ahead and remove those other three. That one was tight. If we were just doing some repair work and we were going to reuse these lifters, it's always a good idea to mark which one came out of which hole so they go back in the same place for wear patterns.
There are our two rear ones. I'll go ahead and take these two out and then we'll remove our lifters. Now we're going to grab our magnet, and look at that. Now you can see the flat. See that flat? You can actually see where the pin was contacting it.
When the lifters go back in, you're going to install them like that. The pin's going to keep it from rotating because there's our roller that goes up against the cam.
We're going to go ahead and take this cover off because obviously that's going to be right in the middle of the road and it's probably easier to pop this off than it is to take that off. That's only three screws here. In order to take that off, we'd have to pull this silly cotter pin and that pin that's pressed in there and blah blah blah. We'll just take these three out and move this to the side.
Step 8: Removing The Ignition Module
Now we're going to remove the ignition module, and even though these have a pretty nifty timing light, I'm going to go ahead and mark it with a sharpie so I know where it was when it was timed, just because I can.
You see there's a little V-shaped slot there. I'm going to go ahead and draw a line where the V-ish slot is. Two pillar bolts out and we're going to have to find the darn plug for the ignition.
I think we'll spray a little luba dube in there because we're going to be pulling it out, and by wiggling the wire down here, I can see this is the pickup and here is the plug for the pickup on the frame.
We'll go ahead and unplug that from the frame. She's a dry one. Leave those two there. We lost our special clip thingy. Here we go. We got it unplugged so when we take this off, this will go with it. I'm just going to pull it up a little bit too. So much for that program.
Now the next thing we're going to need to take off is this cup that has the two little windows that goes through there and tells it when to spark. This cup is attached to the end of one of the cams. Imagine that. Oh boy. No more big mysteries going on there, is there?
Step 9: Removing The Cam Cover & Replace Old Cam
I think we're ready to pull the cam cover. See there's the end of the cam, look at her. You'll also notice, we'll show you this real quick, even though you'll see it again later.
That little titty right there corresponds to that little notch and that's how these two windows will know when it's going on for that chinga. We're going to go ahead and remove the cam cover now.
If I remember correctly, most of these bolts are different lengths, so one of the tricks that you can use to keep track of these is you can get a piece of cardboard and draw a picture of the cover and poke some holes in it and stick the darn bolts in the holes.
The other way you can figure it out when you have the cover off is to put the bolts in and they should all have the same amount of thread showing, but we'll have a look here. It's been a long time since I took one of these off.
There's another trick I used to use to keep track of where the screws go. I had a really long magnet and what I would do is pick a starting point. Since this is the top one I'd put that one first, then that one, that one, that one, all the way around in a line.
Just be careful when you put it back together that all the bolts are going, the screws are going back in the place where they came out of. Only two more to go here.
All right, I went ahead and figured I'd go ahead and demo this little job here because it just makes life a lot easier. Already I can see those two are different. That one's longer than the other ones. Short one, long one. Long one.
When we're ready to go back together this will make life a lot easier and we will also won't lose any of our screws that way.
All right, got them all out. Cam cover off. Yes, right. That thing's stuck. Really? Are you kidding me? You do want to have something underneath there as you can plainly see there's a bunch of freaking oil in there. We've got our cam cover broken free, somewhat.
There she comes. Just wiggle her off of there. We got a breather on there, that's not helping matters very much, is it? Lovely Harley likes to use these stupid pinch clamps that you can't just unthread it and take it off now, can you?
Look, one of our cams came out with the cover. Oh bummer. Good thing we're changing them. Now the timing's all out of whack. Gosh, darn it. All right, let's get this hose off of here.
There she goes. I think we got the clamp mangled enough that it'll come off now. There we go. It really doesn't matter if we show you how the marks line up because we are going to be putting new cams in there and we're going to show you how those marks line up when you're putting the new cams in.
We are going to be putting a new gasket on here. This part's going to be really hard, watch. We're going to remove these old cams. Oh boy that was tough. Oh my goodness. There's another one.
There's the last one. All we got to do now is clean up this mess because we're going to be putting a new gasket on there after we put our new cams in, so let's get that done.
Next, we will show you how to assemble the S&S Cycles Hooligan 1200cc conversion kit.
VIDEO: S&S Cycles Hooligan 1200cc Conversion Kit How-To Part 2 - Assembly
In this section, Todd walks you through the installation on a S&S Cycles Hooligan 1200cc conversion kit with oversized cams on a 2003 Harley-Davidson Sportster 883cc engine.
Time Stamps:
00:01 - NEW CAMS... Awe yeah!
00:46 - Note what year motor you have, you may need a different pinion gear.
01:46 - Checking cam lobe to crank case clearance on each cam.
03:45 - Rotate the engine so that the fly wheel is in the correct position to set the timing marks of the cams.
04:16 - Identifying each cam and what position it goes in.
05:05 - Installing the cams correctly and lining up the timing marks.
07:24 - Verification of the timing marks on the cams.
08:12 - Changing the seal on the cam cover.
10:25 - Reinstalling the cam cover, always use a new gasket.
12:16 - Shiny new fasteners!
16:31 - Sequence on how to tighten the cam cover bolts.
18:49 - Rotate the motor to test that there is no binding in the cams or any problems once the cam cover is installed.
19:28 - Reinstalling the timing pickup cup and ignition.
21:17 - Installing the new lifters.
25:32 - Preparing the new cylinders and pistons. Make sure to inventory your parts. 27:00 - Separate rings and determine where they will be installed on pistons.
28:41 - Determining the ring end gaps and how to check the rings.
34:34 - Installing the rings onto the pistons.
37:47 - Check the pin and the upper rod bushing fitment.
38:15 - Installing the circlip on one side of piston.
39:36 - Clean up any leftover gasket material on the crank case.
40:25 - Installing the pistons onto the rods.
43:45 - To be continued... to part three
You can read the full transcription of this video here:
Here's our new cams provided with the Hooligan kit. Guess what gang? I'm going to consult the instruction sheet, just to be sure we're doing things right here.
One other thing, the new cams, it looks like they got cosmoline on them. That's to keep them from corroding while they're in the box being shipped around the countryside.
We're going to go ahead and clean these off, figure out which ones are which and get them installed and show you how to line up the timing marks. After studying the instructions for a few minutes, I've realized that depending on what year you're working on, you want to pay attention to your pinion gear that's on your crankshaft.
These cams that come with the Hooligan kit, they don't say it on the box but I looked it up. They're going to be the 482 cam from S&S.
According to my information here since this is a 2003, I don't have to mess with my pinion gear, yay. I could just put my cams in and be done with it. If you do have a '91 to '99 or an '86 to '87 or certain models, you just have to pay attention.
There's a neat little picture there of the different style pinion gears that they have available. If you're doing these cams in this particular motor, they're going to want you to change the pinion gear to a different one.
Well, we got lucky, we don't have to mess with that. The next thing I looked at was checking, what's this picture to?
Okay, number three, cam lobe. Check bearing or bushing and crankcase. Spin the cam 360 to check for lobe to crankcase interference. I distinctly remember the last time I used some cams, they were supposed to be bolt-in but they weren't and I had to clear the crankcase.
Well, that one looks pretty good. There's my lobe to the crankcase. She's a close, but it can't move up and down once everything's together. That one looks pretty good. This one, and-- You know what? I think we will go ahead and install it and we'll rotate the rods and we'll look at it then, just to be sure.
We'll take this stuff out of here. This will turn that and then we'll be able to make sure that we're not having any contact. It seems to turn, no problem. All right, number two looks good. Let's check this one. All right, that one looks good. The last one. She's a tight one but we'll be alright.
What I've done after I got done pulling this one out, is I rotated the engine so that the timing mark on the flywheel is in this location because that's what it shows in the picture book that came with the cams.
Let's go ahead and put our stuff back in there, we're done rotating the engine around for now.
We'll put our rags back in there to keep unwanted items out of that area. In order to identify which of these three goes in which hole, you just look at the cam, the marks, the timing marks.
Number one is going to have one dot. Number two, it's going to have three dots and it's the big one, so it's not so difficult to figure out where that one goes. Number three cam is going to have three dots on it. That's because it has to line up with two different gears, number two and number four. Number four is going to have two dots on it. They're nice, they give you one at the tooth and one there, so it makes it a little easier for you.
The other thing is, we've got our mark lined up there. On this one, this mark here is going to line up with that one. This one's going to line up with this cam and this one's going to line up with this cam. You can't put this in first because these two have to go in first because this gear won't let those go in second. We'll start by putting this one in. We should probably also put a little bit of lubber dubber on that new cam to the bushing.
Even though it's pretty oily there, it still won't hurt anything. Let me grab an oil can here. I've put my number one in, I'm going to put my number three in and then I'm going to try to figure out where I need to have these in order for all the marks to line up.
I'm also putting just a little bit of oil on the new cam before I put it in the bushing. We'll also put some oil on the gears after we get it all together. We'll squirt a little oil on the gears. This one is going to be single mark facing this way, single mark, double mark facing that way.
Once again, this one has three marks on it. This is the hard part. This mark is going to line up with the flywheel and there's our line on our flywheel. Let's just get an idea of where we need everything to be and then we'll get it together. You'll see that these won't mesh until they are lined up. There's that one. Here's this one, it needs to be right about there and that one needs to be right about there.
Let's see where we are on the inside. How did we do? Dot to dot, dot to line, dot to dot. That's all there is to it. We have one last one to put in. A little oil on her. We've got-- this one should be pretty darn easy. Bam. There it is, lined up. You can compare it to your picture with your instructions and you'll see all the places they line up and the fact that we have all the cams in their correct locations.
Kind of hard to put them in the wrong place because you'd have stuff that wouldn't line up. We'll verify it one more time. That looks good, good, good. Bam, not so difficult, is it?
Now we're just about ready to put our gasket back on, put our cover home, we're going to put a new seal on the cover along with our new gasket. We'll button up this part and then we can move along and start putting our new pistons, rings and cylinders on. Whoo.
Before we put our cam cover back on, we're going to go ahead and change the seal right there that seals the cam from oil from leaking into here. I went ahead and pulled this out so I can get to it.
Normally, I would use this handy dandy seal puller, but I'm seeing that that's probably not going to be the best plan of action because I really won't have a whole lot of leverage. I think I'm going to go ahead and use this small pry bar.
What I'm going to do is I'm going to turn it over. I'm just going to use this tool right here from the backside, being careful of the bushing. Look at that. There she goes. Look at her.
There she is. That worked just fine. That little spring thingy came out. Now, we'll go ahead and clean it out. We'll go ahead and put our seal in with the closed side facing up.
I've got this kit right here that you can buy at your favorite inexpensive tool store, seal driver kit, also works well for bearings. A great little kit to have, not very expensive. This one here looks like it'll be the right size.
Yes, that should work pretty good. Make sure your seal is even all the way around before you start driving it. You don't want one side to go in first and not the other side and then it gets all caddywhompus. That's not good. You can put different sizes on the handle for different seals, bearings, races, yadda yadda.
It looks like it's pretty even. Just like that, there's the seal, a new seal installed in the cover. We're ready to put it back on the engine with a new gasket. Let's head over there now. All right, we are ready to put the cam cover back on. I gave it a quick blow down with some brake clean, kind of wiped the gasket surface off to make sure it was clean and dry.
We've got a new gasket here. I'm going to be using a James Gasket. Be sure that your gasket is correct for your model because there are some differences in the slots and the configuration of a Sportster gasket, the package on this one says," 2000 and up," so we know that's right. The Harley gasket is kinda much thinner and has metal in it. This gasket is going to work just fine, no problem there.
Ok, so verify your marks one last time before you put your cover on. It doesn't hurt. Just make sure. Okay. Dot to dot, dot to line. Dot to dot, dot to dot, dot, dot, dot, dot, dot, dot, dot, dot, dot, dot, dot, dot. Okay. Everything's cool there.
We also want to go ahead and put some oil where the gears are meshing with each other, like a saw, not too much so that it gets everywhere but just enough so when she rotates, you've got some oil on those teeth.
We're just going to put a little bit of oil on here where they go into the bushings. On the cover. Oh, that's not what I wanted to happen. That's okay. We'll be alright. We'll wipe that off.
Okay, so we've got some oil on here. I also decided we're gonna go ahead and use some shiny fasteners. Who doesn't like shiny fasteners? We've got all these awesome Colony kits on the Web site. I opted-- I'm going to be doing cam cover. I'm going to do these pins. I'm going to do the lifter blocks. I'm going to the rocker boxes. I got a primary cover kit, they also stock a complete engine kit, so if you have your motor completely torn down and you're rebuilding it and you want to put shiny fasteners on it, Colony is the way to go.
All these kits are available on the website. You may remember that we did this. So, what we're gonna do is we're going to use this as a guide. Once we open up our kit, we get them in the right places on a stock, Harley fastener, the washer's captive. In other words, it can't come off of the screw fastener.
On the Colony kit for these, the fasteners come loose in the package. There is, if you look at this style of washers, you're going to see one side is rounded and one side is flat. I'm going to go ahead and put all the rounded sides facing the head of the fastener. You want the flat side on the cover like a saw.
The best plan of action was to go ahead and replace them one at a time in here so that as I'm doing it because there's three different lengths on these. Now I have this nice little guide as I go along and just put them in and not have to think about which one goes where, because two of them are long, but one's longer than the other and you don't want to put the longer than the other one hole
Okay, great. I also scrounge around my toolbox and found me a worm drive hose clamp to replace these funky Harley ones. The first thing we're gonna do is we're gonna go ahead and put the cam chest breather hose that connects to the old tank back onto the fitting on the backside of the cover after we clean the oil off of this again.
That's the fitting right here, just going to this house, this is kind of a fiddly little thing here. You're just gonna plug her in, not the easiest thing to do. There she goes. We've got our hose on there. One other thing we want to do is we want to put just a little bit of oil on the seal to help it. The camshaft. All right, go get our gasket on there. I know this is kind of a fiddly thing, Harley putting that silly hose on there like that. One last time, we'll wipe the oil that keeps leaking out of the pump here.
New gasket. There's one dowel that locates our gasket. Isn't that nice? I guess I'll be okay. I'm probably going to start with these rear ones because see how it's drooping down just a skosh. I'm gonna go ahead and get all my fasteners in before I tighten anything.
Okay. Ready to put the cover on. Let's see how this goes. Oh, that was pretty good. She's seated. We can go ahead and start putting our screws in using our guide. Just as I thought, the gasket's drooping down on that hole. I pulled it out ever so slightly to-- There she goes. We weren't going to bore you with me putting 11 fasteners in a cam cover, they're all installed.
If you look at the instructions, there's a sequence of tightening on those and it does say to torque them 280 to 110-inch pounds. I'm going to torque them by hand and I'll tell you why. Got a steel fastener and aluminum, had an incident a number of years ago with an inch-pound torque wrench on a cam plate for twin cam and ripped the threads right out. I can feel what 100 inch-pounds feels like. I don't need an inch-pound torque wrench. If you'd like to use one in your garage, go for it. If you pull the threads out, don't be calling me. One other thing I want to mention, too, about chrome fasteners.
If you're installing one and it feels hard going, there is a likely chance that there may be a buildup of chrome on the threads of the fastener. No-fault of the manufacturers, it's generally the Chrome shop. You want to stop, regroup, maybe run it, the fastener through a dye and then try it again. You just got to cut the chrome off the threads. I had one fastener like that and we did that when you weren't looking. But at any rate, all the fasteners are in, I am going to use the guide that's in the instructions for the sequence of tightening. They're saying number one is this one, click.
Two is this one. Click. That's my calibrated elbow. Three, four, five, six, seven, eight, nine, 10, 11. There you have it. New cams in, new seal, new gasket, cam cover's done. Look how nice those shiny fasteners look, don't they look good? We're going to go ahead and rotate the engine, make sure everything's spinning freely with the new cams in there. Oh, look at that. That's nice. Nothing going wrong there. No binding. Everything feels beautiful. We're going to go ahead and put our rags back in there again. Once again, I don't want any foreign objects going into our crankcase where our rods are cause that would be bad.
Now that we've got the cam cover all buttoned up, we can go ahead and put this pickup back into the end of the cam. Once again, it's a good idea to put this up first without the screw. There's this notch which coincides with the cam that we showed you earlier. So you can basically put it up there and kind of move it.Oh, there it is, right there. I can feel, and then hold it with one hand and start your screw with the other hand. [music]
I would guess, if it's not in that spot, it's going to be all cattywampus. [silence] Tight enough, don't need to overdo it. We're just going to pull this wire back through, put our ignition unit back in there. Since my mark is long gone, we'll be timing it later. You can see on that plate, the round circle from this part. I'm going to go ahead and put it there and then that'll be a good starting point for when we get everything all back together and we're setting the ignition timing.
I'm just going to reinstall these. I'm just going to snug them up. I'm not going to tighten them down all the way right now. I guess the moral of that story is, if you want to mark where it was before, scribe it instead of using a sharpie. That's that. You don't have to worry about that just yet. We got the cam cover all buttoned up, we can go ahead and put the lifters in now. Kit comes with new lifters. Got them out of the package here ready to rock. I am going to use the oil can and I'm going to squirt some oil down to the hole so it goes on the cam lobes like a saw.
When we're putting the lifters in, you want that roller pin to be facing out because this roller rolls on the cam lobe. If you put it this way, that's not going to work. Also, there's these flats for our pins. When this goes in, the pin goes in here, rods against that flat and keeps this from rotating. Probably also wouldn't hurt to put a little oil on the lifters. Some people like to suck these things in a pan of oil to pump them up. I really don't have a problem with letting the engine pump it up. Once the engine starts after it's rebuilt, you'll just hear a little lifter ticking until they pump up and then it'll be fine.
We've lubed up the cam lobes, we've lubed up the lifters. We've got some new Colony, anti-rotation, shiny ones. We're going to use those. Once again, going with our chrome theme on the fasteners. Same program as the other ones, rounded side, flat side. Also, there's some holes on the lifters on this engine. It really doesn't matter which way they face. The lifter is just going to drop down into the hole like a saw.
We're going to put the anti-rotation pin in there. It feels like my lifters just turned just a scotch when I dropped it in the hole. I'm going to get a pick or magnet and pull it back up out of there. Bada bang. Yes, she was turned over so slightly. You'll know if it's not in there. It got turned when I dropped it down in there. That looks good. See now the pin is starting.
Simple as that.
There’s another one in the hole.
That's so good.
All right, we're going to go ahead and get the cylinders and pistons unpackaged in preparation for checking the ring in the gap. Make sure you inventory your parts. Here goes the pin, the piston, the cylinder and we need some clips. There they are. I can tell we're going to have to clean that out. It feels like they've got something on it for packaging purposes and to keep it from corroding.
We're going to clean those out before we get going here. Let's get something on the workbench because we like everything to be nice and clean. Anytime you're doing engine work, you want to keep things clean.
Lots of cardboard in there. Look at that. These are some locating dowels. Here's the other ones for that one. Those are going to get installed in those holes there, you'll see.
From experience, I'm going to guess and we'll look at the instructions in a sec. Shiny one's probably are going to go on the top. I like to set my rings-- Usually, most rings come in a package that you unfold and I mark them but I'm guessing these are all loose. That's going to be the top. That was probably going to be the middle and these will be the bottom. We'll go ahead and separate them into piles like a saw and then we'll look at the instructions and see if I was right.
This instruction sheet I was just referring to while we're working here is for the piston rings. When I get to the little chart here, that tells you what ring in the gap they're looking for, we'll show you how we're going to do that in a second. It's got some crazy chart that says, application, street high performance. Top ring, four times, 0.0045. I was like, I'm pretty seasoned. Do I want to figure out, find my bore size, take it times that to get my ringing gap? No, I want a specific number. So I said, “Let's try looking at the other instruction sheet that came with the kit.”
This one says, "Piston's in cylinder kit." What did I find? Oh, really nice looking picture that you can probably see a whole lot better picture of that, that you could probably see from all the way over there. When I get to the next page, suggested ring in gaps. This is what I'm used to seeing in the field, working at a shop, putting big bore kits on, day after day after day. It basically tells you top ring, minimum gap, 16,000s, maximum, 22,000s. Second ring, 16 to 26. Oil control ring, 10 to 50. 50? That's a lot.
Now that we have a real number, I got my feeler gauges out. We're going to take the top ring, shiny one, and you're just going to place it in the bore. I like to put it in at an angle like that and then turn it. What you do next is you take your piston and you square up the ring in the bore. So in other words, we want that ring to be sitting in the bore even to do the measurement. We're looking for 16,000s minimum. We're going to take our 16-thousandths feeler gauge, that's 0.016 and we're going to put it in the end of the gap that's on the ring here and we're going to check it and 16 goes. That's good. We can continue to go up a size and figure out what it is. You know what, let's go ahead and do that just for the heck of it. We're just going to go up one size at a time to see what our actual ring in gap is. 17 goes, 18 goes but real tight.
I'd be safe to say that the ring end gap on the top ring on this cylinder is going to be 17-thousandths. That falls well within our spec of 16 to 22. Good to go. No grinding required.
Take your ring out, put your next ring in. I started with a 16 on the second ring, the one that goes in the second groove on the piston and she's the same as the other one, 17. I'm pretty happy with that. That's perfectly fine. Upon further inspection of the second ring, I noticed there is a very slight bevel on it, which corresponds to Figure 3. According to it says, "If ring has no dot but does have an inside diameter bevel, the bevel goes to the top."
In other words, when this gets installed on the piston, that little bevel is going to face up towards the top of the piston.
Once again, verifying the top ring is in fact square at the end. Well, it's not really square but it doesn't have a bevel or a dot. Oil control rings, same program, square it up. Once again, they want to see on the oil coil control ring a minimum of 10, but it goes up to 50. That's a pretty big gap once again, so I can see it's way more than 10. I don't need to get my 10 out. We'll start with our 17 because we already have it out. It's way more than 17.
I don't think there's going to be any need to change any of the end gaps on these rings, but it is very important that you do check them, maybe on a different job you're doing. It's much bigger than that. If you don't have any ring in the gap, you're going to have a problem. If you have way too much rings in the gap, you might have a problem.
Basically, back in the day when I was doing shovel heads, I liked to see 15-thousandths. We're getting up there. We're at 30 and it's still too big. What do we got going on here? Let's see. What's our biggest? Well, hell, ring in only goes up to 35. How are we going to check 50-thousandths? Let's try this one. We have a winner.
No. Actually it's maybe just a little bit more. What we'll do is we'll add a smaller one to this one. That's how we're going to check it. If it's larger than what we have in our feeler gauge, we're going to put two of them together. Now, that's 40-thousandths, if we add five and 35, that's pretty simple math there. Just verifying that it is not 50. I'm pretty happy with that one. I'll just go ahead and repeat the same steps for the other cylinder. Check your ring end gap, important. We're going to go ahead and move along to getting the pistons installed on the rods and then we'll put the rings on. We can put the rings on before we put them on either way, it really doesn't matter.
It's probably easier to go ahead and put them on, on the bench and then put the pistons on, put our circle ups on. Then, after that, we'll use our ring compressor and we'll get these cylinders installed there. We'll go ahead and get the oil control ring on there. You'll put this expander ring on first down to the bottom groove and then one each of these. Either way around. There is a tool for doing this. It does make life a lot easier. You got to be careful with these rings. That thing's all cattywampus. There she goes. One other thing I want to show you too real quickly here. As you're doing this all control rings you'll notice the way that ends butts together. You don't want it to be like that or like that. You want it to be like that.
You'll see when we get it on there, it'll make better sense. We've got the expander ring, one of those on the bottom, and now we're going to put one on the top. We'll go this way with it. She went in the wrong group. Start over. There you have it. Now we were ready to put the second groove ring on. Once again, we've got that bevel that's going to face up.
There it is. There's a tool that they make that I forgot to bring today. What it does is you put it in the end here and you kind of squeeze it and it opens this up very carefully and then you can just put it right on. Since I don't have the tool and you might not have one too, we're doing it the old fashioned way where we're just carefully spinning it by hand, so it goes over the piston and into the groove like so. That one's ready to go on the engine. We'll go ahead and do the other one, but one other thing that we want to look at very quickly is there's an arrow on the top of the piston. It says, "Forward."
Both of the pistons when they get installed on the engine are going to be facing this way. Here's our piston pin and our clips. What I find is much easier to do with the clips is to go ahead and install one in the piston and then go ahead and put the piston on the engine so you already have one installed and then you'll slide your pin in, it'll hit that clip, and then you put your second clip in. The other thing I like to do is always check the fit of the-- Look at that. She's nice. It goes right in very nicely. On a high mileage engine, you also want to check if this pin fits this. If it has considerable play, then it may be time to renew the upper rod bushing.
Since this is not a high mileage engine, we don't have to worry about that. You'll notice there's a little groove in here and that's basically for removing the clips. When you put it in there, you don't want the open ends in that location. Now, there's also a special tool for putting these in. I can't expect everyone in their home garage to have all these darn special tools, so we're going to go ahead and do it the old way and just put it in by hand. We're going to show you an easy way to go ahead and get the first clip in if you don't have the special tool. Once again, we don't want that in gap to be right there where that is or it's difficult to remove it the next time.
I'm going to push that into the hole straight, see how it's going straight in. Then once you get it past there, you can kind of turn it and you can see that it's starting to go in the groove on the top but not on the bottom. What you do is you just take the pin and put it on the other side and then when you push on that clip, you'll hear it click in a second. Bam. I used the pin to center it and now it's clicked into the groove.
We're ready to put the pistons on the rods. Before we put the pistons back on, you need to make sure that you've removed all the old gasket material from the crankcase and I have already done the other side. It's okay to use a razor blade and a little tip for you. You want to hold that razor blade at a 90 degree angle and then you won't damage the aluminum or make any grooves in it. There's a little bit of gasket material left on there. You just want to scrape away at it 90 degrees.
Don't get it down in the crankcase, that's what the blue towels are for. You want that gasket surface. You can see it there. You want to get that old junk off of there in preparation for putting the new gaskets on. We've finished cleaning all the gaskets off, it's all nice and clean. I wipe those out real quick and the next thing we want to do is we want to put a little oil on these before we put the pin in there, like a saw. Don't worry about that, it's going to drip out any second. It's not a big deal. Once again, faces forward. Go ahead and get our pin started on one side.
If it goes in too far, you won't be able to get it on. You're just going to hold that like a dart and you're going to wiggle it around till it goes in like a dart. Also it's a good idea to have something like this on there, stud protectors, you don't want the pistons riding against the stud like so. We'll use those while we put this clip in and when we get to that one, we'll move them. I should have some more on there but I don't. Once again, forward, start your pin. The other one went on a lot easier than that, didn't it. There it is. Wait a minute. There she goes. Look at her go. We'll just put a towel around that for now. Next thing we're going to do is we're going to put the clips in.
Once again, there is a special tool for this job, makes life very easy. We don't have any special tools. We're going to do it the old-school way. Hopefully, it won't go sailing across the shop. I almost got it all the way in by hand but once again, if you have the tool, it makes your life so much easier. There she goes. Half of it and there she is. Get her in there any way you can. Careful, being careful. Then, you want to always verify it is all the way in the groove. Generally, I'll check one last time before I put the cylinder on. We got that one in there. Now we're ready to do the other one.
VIDEO: S&S Cycles Hooligan 1200cc Conversion Kit How-To Part 3 - Assembly
Next, Todd walks you through the installation on a S&S Cycles Hooligan 1200cc conversion kit with oversized cams on a 2003 Harley-Davidson Sportster 883cc engine. These kits work on 2000-2018 Harley-Davidson Sportsters and can be installed on your motor with in a day spent in the garage. This episode covers from the setting of the rings on the pistons to installing the cylinders & cylinder heads and prepping the rocker boxes for install.
So, break out the tool box and follow along. See how "There's no big mystery going on in there!" This step by step and does not skip anything, and will help you understand how easy it is to install this kit, beef up your motor and add some real horsepower to it.
Note: Disregard the cam portion of this video if you are only doing a big bore conversion kit install.
Time Stamps:
00:01 - installing locating dowels into the top of the cylinders.
01:46 - Staggering the ring end gaps on the front piston accordingly.
05:00 - Make sure to remove rags out of the crank case from front cylinder.
05:06 - Install the base gasket on the front part of crank case, line up accordingly. 05:26 - Using a ring compressor, lube and compress the rings on the front piston. 06:14 - "Alright, let's give a whirl!" Introduce the cylinder back onto the front studs sliding it over the piston and rings.
06:37 - Take ring compressor off and slide the cylinder down the rest of the way. 07:49 - Be Careful and don't crunch your fingers.
08:14 - Repeat steps and do to install the rear cylinder.
08:23 - Staggered ring end gap overview.
08:51 - Using a ring compressor, lube and compress the rings on the rear piston. 09:24 - Install cylinder over the rear studs sliding it over the piston and rings.
10:14 - Scrape and clean gasket surfaces on cylinder heads
11:07 - Remove exhaust ring from the cylinder head.
11:20 - Remove the top pushrod o-rings from the cylinder head.
12:14 - Bath time! Scrubba dub dub, cylinder heads are going in the tub.
12:51 - Give'm a quick blow job. Ha!
13:13 - Installing the front cylinder head and pushrod tubes.
13:25 - Installing the new exhaust ring and upper push rod o-rings.
14:06 - Installing lower pushrod seals and pushrods onto the motor loosely.
15:58 - Put the MLS head gasket on and then introduce the cylinder head to the engine lining up the MLS head gasket and pushrod tubes.
16:53 - Installing the head bolts.
18:57 - Torque the front cylinder head properly.
22:15 - According to S&S, loosen and torque all over again in same sequence. 24:51 - Tighten the pushrod tubes at the bottom of the front cylinder.
25:35 - Installing the rear cylinder head and pushrod tubes.
26:38 - Torque the rear headbolts, note its a different sequence pattern.
28:37 - According to S&S, loosen and torque all over again in same sequence. 30:34 - Tighten the pushrod tubes at the bottom of the rear cylinder.
31:02 - Rocker box cleaning and preparation.
32:27 - Rocker shaft inspection and overview how to remove and reinstall.
34:28 - Clean up and remove any gaskets from rocker box ring and rocker box top. 36:48 - Need to replace gaskets on top 8 bolts or replace bolts with Colony
37:53 - Installing new breather valve on the intake side of the middle rocker box ring.
37:42 - Make sure to prep both rocker box assembly the same way.
38:24 - To Be Continued....
You can read the full transcription to this video here:
All right, you need to install these locating dowels in the cylinders before we put them on the bike. I've already installed one because I was trying to see what would be the best method. Technically, if you had a press, you could put this in the press and go down. Or you could put it in a hydraulic press and put something against it and press it in but since we don't have that, we are going to do it caveman style. I've got this brass punch.
That is softer material than the dowel I'm going to be beating upon here in a second, and immediately, it wants to go cattywampus. We're going to try to get it started. There it is. It looks pretty straight there. There she goes. You'll see there was no harm to the part because this is softer than that. Obviously, you don't want to use a steel punch on there, that may damage it, this is brass. It looks like it's just a little bit proud on that side. That looks pretty good right there. Install those four dowels then we'll be ready to go ahead and get these cylinders on there.
All right. The S&S instructions for the ring in gaps is just a little bit different than what I said previously about staggering the end. They've got it a little bit further apart. It's hard to tell in the drawing but you're basically going to find the end of that expander ring and then you're going to rotate that expander ring until that gap is facing the front. Then you're going to find the ends-- this is a tedious little operation. Sometimes you got to spin it around a couple of times. You got to find your ends of your rings. Okay, here we go again. I move that around, now, we need to see where the ends of the other rings are and you're just going to-- there is one of them. We're going to slide that away from the other one. Here's the bottom one. Oh, there we go. I'm going to move that away and then I'm going to find the top one.
Once again, we've got the expander in the middle, we've moved the bottom one over to here and we're going to move the top one over to about here. Sometimes you have to push these back out just to find that end and then you're going to rotate it back around so as long as-- Oh, wait a minute, there it is right there. Never mind. It's all good. It's right there. There's the end of the top one of the three on the bottom so we're just going to take and-- Sometimes you've got to use a pick or something just to slide that around. There she goes. There it goes. Basically, what we're doing is staggering the ends. Okay, there we go.
Now we have the top one facing here, the bottom on facing here and the middle one facing here. Now, according to what they want to do, they want you to do the top ring facing here. What we're talking about is the end where the gap is. There is the top one facing this direction. Then they want to do this next one down facing this way. Once again. You can see how everything all wants to turn so if something else turns while you're doing this, you can just put it back to-- There is that one. You just don't want all your end gaps to be lined up. Another good rule of thumb is you don't want it facing the intake or the exhaust if I remember correctly.
There we go. Now we have all our ring in gaps set to put this front cylinder on. We can go ahead and we'll take these out of here. Be careful with the piston and we'll go ahead and transfer those over to here. Then we can take our rags out of the crankcase. All right, we've got to put the base gaskets on. Don't be confused by the writing on there because one will go upside down because they're basically the same. This one's going to go over the four studs past your rings, down to the bottom. Then we've got a dowel right here to line up and a hole right there to line up and that's all there is to that.
Now, the next thing we're going to use is we have a piston ring compressor. This is kind of a necessity on this job. I don't really recommend trying to get it on there without the tool, although I suppose you could. I'm going to put a little oil on the tool like so and just get her lubed up so she slides. This is going to compress the rings because the rings need to be compressed to put the cylinder on like so. All right, let's give it a whirl. All right, that feels good. Take the compressor off. Hang on, let's take this off. It looks like one of the small rings may be popping out or if we just take it in with our finger, we should be good.
We have to take this out past the rod. It looks like in that very bottom. I think we're over it now. Don't crunch your fingers in there like I just did. There you have it, one cylinder installed. All right, so now we're ready to go ahead and put the rear cylinder on. We've got our base gasket installed. We've got all our rings located in their correct orientation according to the chart.
I will show you real quick here, there is that one, the end gap on the top ring, end gap on the middle ring, and the end gap on the bottom is kind of hard to see. We'll go ahead and get our ring compressor on there. Obviously, we took our towels out of the crankcase. Hopefully, this one will go on a little bit easier than the front one, it was hard to go in there at the bottom when it got to that last ring.
Take our stud protector off of there. I've put just a little bit of a Marvel Mystery Oil on the base of the cylinder. Again, proper orientation. There you go. After much difficulty we have both cylinders on.
We need to scrape the residue from the stock head gaskets off. The head gaskets off of there but look at all that scrub that's left on there. It's again razor blade at a 90-degree angle again like we showed you on the cylinder base and don't worry about this stuff going everywhere because we're going to wash these heads off too, but see if you just, you do that at a 90-degree angle it doesn't mess up the surface where the gasket goes but we got to get all this-- Look at all that screwed coming off of there.
We're not going to worry about that carbon on there. It's not a big deal. You also have an exhaust ring. It's easier to take these out with the head off the bike and also will reinstall them you just use a little pick and pop that out of there. That's your exhaust gasket. We'll be replacing those and we also have two O-rings for the top of the pushrod tubes. Those are going to get replaced.
We'll take all that stuff out of the head, head gasket surface cleaned. Now we're going to-- We'll give it one more shot here because it looks like there's just a little bit left right there. Then I'm going to spray some brake clean on it. We'll put it on the floor on a piece of cardboard spray some brake clean and then I think we might actually go over and wash these off with some hot soapy water and then we'll blow them dry.
The water won't hurt anything. The valves are closed we'll make sure we clean the ports and the springs all real good with, so there's no water left on there. They'll just look a lot better than they do now because we've got these nice new clean cylinders on there so we want to try to get these as clean as we possibly can. We're going to give this a little scrub down here with some of this cleaner and see if we can get these looking a little better than they do.
I would say that was worth the extra couple minutes we took there. Go ahead on back to the shop and blow these off. Let's go ahead and give her a quick blowjob. [blowing] It's time to go ahead and get the cylinder heads and pushrod tubes installed, whoo. Before we do that we'll go ahead and put our exhaust port gasket in there because it's easier to do it with it like this this, little chinga gets shoved in the hole there.
You got to push it in nice and straight, make sure she's bottomed out. It's hard to get to it when it's on there. There we go. We're also going to put the upper pushrod O-rings in these holes right here, like so. Then we're going to go ahead and put the lower pushrod seals in these holders with the tube. Well, hell, let's do it a different way. Let's put that on there first and then put this on here because you got to pull it over there. Slide it up a little. Putz around with it just a little bit more and then we're going to go ahead and put the pushrod tubes on the engine the right way around.
I'm not going to snug those all the way down until I get my head on. A new head gasket supplied in the kit. It sticks up funny. We'll be careful when we put the head on. It looks like it's located okay and we're checking up in the hole here to make sure that the pushrod, top of the pushrod tube is in that O-ring. That's what that will look like. Now, the next thing you want to do is you're going to go ahead and put your four head bolts in but you want to squirt some oil in here, like so. I go ahead-- I like to start all four by hand. As you'll notice as you snug those down it'll push the pushrod tubes up into those top seals and we've got these just snug, we don't have them completely tightened down yet.
You're going to be using a half inch 12-point. I'm going to go ahead and snug these down the rest of the way till I can feel that there at the bottom, like so. Now we're ready to torque the cylinder head. All right I was just reviewing the official S&S instructions here. Normally when you're using graphite head gaskets like what we removed from the engine you torque it 7 foot pounds, 14 foot pounds then an additional 90 degrees.
Well, since we're using these MLS gaskets which is multi-layer steel there's a different torquing procedure torque spec and so according to S&S they would like me to torque them to 10 to 12 then 15 to 17 and then the additional 90 degrees. Well, then they also want me to torque them all then loosen them then retorque them. We're going to follow the official instructions and they've also provided us with a nice little torque sequence. This is the front cylinder says drive side, cam side. This is obviously your drive side so we're going to go one, two, three, four on our torque sequence.
Let's go ahead and get started. I got my torque wrench set for the first round, this will be number one, there it is. Number two, there it is. Number three, then finally, number four. Okay, now we're going to go ahead and bump up. I'm going to do 10, 15 and then 90. I know it's the lower end of the spec but we are going to be loosening it again when we're done. Then we're going, number one, two, three, four.
Okay, we're going to go ahead and we're going to put a little mark on the head bolt, just a little die. I like to put them there. Then when it's 90, it'll be facing out. We'll go ahead and we'll do these from the other side because it'll be hard to see them from this side. As you can see, I've just put a little dot and then I'm going to tighten in 90 degrees, I'll end up right here. We're not going to use our torque wrench to go 90 degrees because that wouldn't make very good sense. We'll use this long handled ratchet here. Okay, number one. There's our 90 on that one. There's our 90 on that one. I like to do this all in one motion too, and number three is the front one. Then finally number four. Okay, so we went 10, 15, 90 degrees.
Now, according to S&S, they'd like us to loosen them and do it again. All right, let's do that. I'll be interested to see if my dots end up in the same place when we redo this. There they are, fully loosened. Okay, I'm just going to snug them back down to 10. I was darn near at 10 by hand. That's okay. Now we're bumping her up to 15. Whoa, would you look at that, our dots are nowhere near where they were before. We'll just grab a rag and spray clean, wipe those dots off and make some new dots. I didn't seem to have that much trouble getting on that one before. There we go. Got it.
Okay, now we're going to do our final torque 90 degrees and be done with this one. Once again back to number one, number two, three, four. That's it. Front cylinder head is completely torqued. We'll go ahead and tighten these down now the rest of the way. I couldn't get a ratchet on there so I just grabbed a wrench, calibrated elbow method. Okay, this one's done. Let's move on to the rear.
We're going to go ahead and torque the rear cylinder head, the sequence has changed now. It's going to go one, two, three, four. Once again I got my torque wrench set on 10, same procedure different pattern. Now we're going to bump her up to 15. There we are 10 and 15. Now we're going to go ahead and do our 90 degrees. I did a little different on this one because it's hard to get in the back there so I put it here. I'm going to go to here. This will now go to here. Once again, this is number one and we're going to hear. 90 degrees. Number three is this one. Finally number four.
All right, now per S&S, we're going to loosen them and retorque it. We're setting torque wrench back to 10. Once again, 15 and ready to do our 90 degrees. Number one, number two, number three, and finally number four. Finally, we'll go ahead and final tighten the lower pushrod tube seal holders with the calibrated elbow torque method. Beautiful. That's it for the cylinders, pushrod tubes, and cylinder heads. All we got left to do is reinstall our front-rear rocker boxes in our intake manifold.
Okay, we're going to go ahead and get the rocker boxes cleaned up in preparation for putting them back on the engine. On an earlier model bike, you may find paper gaskets that you will need to scrape off. This year has metal gaskets, they come off in one big giant lump-sum. Yay. But you can see that the rocker box is pretty filthy dirty. It's got oil residue where the gaskets go. No scraping of gaskets. I think we'll just spray a little brake cleaner on or just try to get her cleaned up the best we can. I'm not so concerned about rocker shafts. We can show you how those work if you'd like. There's some rust on there. I don't think that's going to come off. We're also concerned with these grooves where the gaskets go. We want them to be clean. Once again a little brake clean works wonders, clean that off. Clean her off. Whoa, don't get that blue tile junk on there. That doesn't want to be inside the engine.
You may have noticed that I removed the bolts to do this. Well, we'll give you a little tip here. On the rocker shafts on these, they just slide in and out like that. Then your rocker comes off like that. Now if you may notice, we'll put her back in there because we're going to put it back together. We don't really need to lube this, they will get oil when she's running. You may notice there's that cutaway on there. Well, that is so that the ball can go past the shaft.
If you do take these out for any reason, you're going to put her back in there, like so. Then you could look down in the hole right there. Hell, you can push it out the other end if you want. Then you can see that needs to be lined up with the hole to put the bolts in. Oh, there's some stuff from our tile. You also notice the bolts that came out, if you do take them out they're all the same. Imagine that. That doesn't really-- Is not important. Then you got your three bolts that go here and your two that go here. We'll go ahead and--
I like to leave these in to start, it helps kind of locate the gasket, and so this is the front one because the rear ones over there remember we put our stuff on the workbench on the way it came off the engine so you do want to put things back the way they came for wear patterns. Technically they are interchangeable so it wouldn't be the end of the world if the kids came in and mix them all upon you. But you know what, I just like to put them back where they came from. Cleaned up.
We also have to clean these. Oh, now we'll scrape some gaskets. Here's our gasket here that needs to come off. Also our breather valve. You just get underneath it and pull it out of there like so. Not reusing the old one. We're going to put it in-- Oh, wait we got one more gasket there. Little gasket. Now there is a little bit of gasket transfer on there that we will clean that off. Definitely don't want, so you can see there's some of the rubber from that gasket on there. We're just going to give that a quick, get that rubber off of there. A little bit there. That's pretty good.
All right, then again, a little bit of brake clean on there, in those gasket grooves. Got old residual oil out of there. Any crap. Let clean these up a little bit too while we're at it. I don't see any gasket left on the other side. That's pretty good there. We'll go ahead and get this one a quick douche. Harley puts clear coat on all our aluminum so it's really not possible to polish this thing without stripping all the clear code off it. We'll just clean her up the best we can. Thankfully it's not super oxidized.
Okay, on all four of these bolts, the very top ones that go in those holes once this goes on there like that, and then this goes on the very top, there are sealing washers. They are stuck to these. Captive washer won't come off the bolt. Basically we're just going to get our razor blade, and we're going to get underneath that sucker, anyway we can. Oh, there we go. Almost there.
Hey, you know what? Forget all about it. Ah, let's use these, and we don't have to scrape any more gaskets. Yay. That ends that job. All right, then you just have to go ahead and repeat the same steps for the other rocker box assemblies. Now before we head over, I'm going to go ahead and put my new breather valve in and mention that breather valves there's two holes you could put them in because this could go front or rear, breather valves go on the intake side, so you're just going to stick it in the hole and there's a little titty sticking out the other side, hot titty and then you're just going to grab the titty and pull on it until the installed. If you look on the thing you can see there's a nubby along with the titty, and that little nubby just goes in that hole and keeps it in place. Bada Bing.
VIDEO: S&S Cycles Hooligan 1200cc Conversion Kit How-To Part 4 - Final Assembly
Finally, in this last part Todd walks you through the installation on a S&S Cycles Hooligan 1200cc conversion kit with oversized cams on a 2003 Harley-Davidson Sportster 883cc engine. These kits work on 2000-2018 Harley-Davidson Sportsters and can be installed on your motor with in a day spent in the garage. This episode covers installation of both rocker boxes and how to properly install your manifold onto your engine.
So, break out the tool box and follow along. See how "There's no big mystery going on in there!" This step by step and does not skip anything, and will help you understand how easy it is to install this kit, beef up your motor and add some real horsepower to it.
Note: Disregard the cam portion of this video if you are only doing a big bore conversion kit install.
Time Stamps:
00:01 - Part 4 the finale!
00:29 - Reinstalling the pushrods. What the colors on the pushrods mean?
00:49 - Put the bike in gear and rotate the engine so the pushrods are at their lowest point.
01:33 - New gaskets. Always use new gaskets!
01:52 - Installing the front rocker box. Pay attention to your rocker arms and that your bolts are setting the gasket correctly.
02:59 - Install 3 smaller hex head bolts.
04:06 - Install the smaller 2 allen bolts.
04:25 - Start with the four large bolts tightening them evenly so the rocker box goes down a little at a time.
05:33 - Snug up the other fasteners. 3 hex and 2 allen bolts.
06:35 - Torque the 9 bolts accordingly starting with the 4 large bolts, 3 hex and then 2 allen.
08:04 - Install gaskets onto rocker box, center and the outside ring, they just rest inside the grooves.
08:43 - Install middle rocker box ring, make sure breather valve is on the intake side.
09:00 - Install the gasket on the outer groove of the middle rocker box ring.
09:29 - Installing the top lid of the rocker box.
11:10 - Make sure the top lid, middle ringer and rocker box are even on all sides before tightening the lid down evenly.
14:09 - Alright let's do it again but this time on the rear cylinder and Todd will walk you through every step again. There are a few small things to note with the rear that you didn't have to do with the front. *Note before starting this process have the pushrods in the rear cylinder and rotate the engine to their lowest point then remove the pushrods -explanation at 16:02.
14:21 - Put on the gasket.
14:25 - Then put the rocker box on only have two large bolts on facing the right side of the bike.
14:47 - Doh!? See what happens when you dont keep an eye on your rocker arms! 15:05 - Install the pushrods in the pushrod tubes one at a time by lifting up the rocker box on each side. Note the colors and where they go.
15:45 - Install the other two larger fasteners on the left side of the rear rocker box. 16:02 - *Forgot to mention note above*
16:30 - install the 3 hex head and 2 small allen bolts onto rocker and lower the rocker box down evenly.
21:28 - Torque the 9 bolts starting with the 4 larger bolts, then the 3 hex followed by the 2 allen head bolts.
24:43 - Install the 2 gaskets on the rocker box, center and the outside ring making sure they are set in the grooves correctly.
25:08 - Install the middle ring make sure the breather valve is installed on the intake side. This one can be tricky because its such a tight area and little clearance. Note how Todd puts the left corner in first and how it falls into place.
25:34 - Install last gasket on outside grooves of the middle ring.
26:05 - The hardest part Installing the top lid on the rear rocker box. Note again how Todd starts with the right side, lifts up and shifts forward and back ever so slightly to get to the right position.
27:19 - Check alignment of rocker box, middle ring and top lid before tightening the 4 lid bolts completely.
29:49 - And there you have it a complete new S&S Cycles 1200 Hooligan kit install. 30:31 - Install some new Spark Plugs.
32:17 - How to change out gaskets on the manifold.
34:22 - Installing the manifold correctly onto the engine. What to do to make sure the manifold ends up straight on the motor.
42:07 - Thats all folks! WHOOOO! Well the bikes not done yet. We will have more videos coming with this motorcycle and we promise once its done you will see it running!
You can read the full transcription for this video here:
Okay. Let's get going here. All right, the first thing we want to do is go ahead and put our pushrod tubes back, pushrod tubes. We're going to put our pushrods back in.
They are color-coded. We talked about that earlier, and we'll talk about it again. Pink's going to be exhaust, brown is going to be intake. You may notice the exhaust is just a little bit longer, so you don't want to mix those up. I'm just going to drop those in the hole like so. Okay, now we're going to go ahead and rotate the engine so that both of those are at their lowest point, similar to what we did when we disassembled it.
We got to have it in gear. Second gear seems to work just fine for this job. We're going to just rotate it. Oh, there's one going up. Oh, she's going down. That's probably it right there, but we'll go around again just for the hell of it. There's one coming up, there's another one coming up. There she's coming down. That's probably the lowest point they're going to be at for putting the rocker box.
New gasket, nice gaskets, James gaskets. Metal with print-o-seal. That'll work better than the stock gasket. Notice she's just hanging around there, and that's why we will leave these four bolts in here so that as we lower it down over there, we want to hold this. You see how these just flop around there? If you put it on like that, with those up, this is going to hit that, and it's not going to go down right.
You just want to rock those up so that the pushrods are going to go in these little things here. We'll just set her up over there and get those holes on the gasket in the right place. Oh, she's weird now. There we go. Then go ahead and get these four bolts started. If you want to make sure your gasket's good, you can just lift her up a little bit, look and go, "Yes, good on that side."
I can see the edge of it over, we're in the holes. You could see that the rocker's hitting the top of the valve stem and the other parts and the pushrod tube thingy. Great, then you got your three hex heads. One there, one right there, and one in the middle right here. We'll go ahead and just run those down a little bit there. That one's hard to get to.
You may have noticed now the rocker box is up, and it doesn't really want to go down because the rocker shafts are riding on the pushrods, and the lifters are holding it up. What we'll do after we get all our fasteners in is we'll go ahead and tighten these four down, going across, in a cross pattern and pull it down evenly. That'll push the lifters down, hence the reason for rotating the engine so that they're both low, at their lowest point because if we were doing this right now and that one was up there, this part of the rocker box would be sticking way up.
We've got all our fasteners in there now, we'll go ahead and start snugging this up, [background noise] evenly. Now, we're coming down there, we'll go to the other side and start tightening those. That's not the ratchet I like, [background noise] I like this one better. All right, she's starting to meet the surface there like the other side. I'm going to go back over here and do this one. Then we'll come back over her and do this one. Then we'll do this one and then this one. I can feel on this side, she's all the way down. That one's all the way down. Go ahead and snug up our other fasteners here.
Then the three hex heads. That one's just spinning down. That one's just going right all the way down, yes. Sometimes you get a little resistance on them, sometimes you don't. Since all the other ones are already down, these are going easy, so I'm just doing it by hand. Now that all the fasteners are all the way down, we'll go ahead and torque
them. I got our handy-dandy torque wrench. On the 5/16s fasteners, torque spec 15 to 18, on the quarter-inch ones, they are 10 to 13. We'll go ahead and we'll talk torque the little ones first, 10 to 13.
I'm going to leave those two for last. Now, we'll go ahead and do the other ones, the 5/16s.
You may remember from my other rocker box gasket leak video, the other ones are inch-pounds, so we're going to talk about hand. We're going to use the old calibrated
elbow. Click. Click. Inch-pounds, done. Now, we're going to go ahead and install our gaskets. There's two gaskets, one here, one here. Don't forget that middle one or she'll leak like a sieve. They just rest on there, sometimes they don't sit in the groove very good. This one goes here.
That one sit in there pretty nice. There we go. We're just going to go around the other side, make sure she's sitting down in that little lip. All right. Looks good. Now, we go ahead and put our middle rocker box on there. Once again, we've already installed the breather valve by pulling it through, we can plainly see that it's all the way in the hold. Put your middle one on, and then your top, making sure it's in the groove.
Now, what we want to do is we want to make this face even because you can do it like that, but that's not right. We'll go around the other side and we'll show you how we even that up there. We're ready to put our lid on. That's backwards because we have two holes here, here, here. The two here are closer together so it goes this way. We'll check
our middle gaskets in there. Go ahead and get that up on there like so, checking to make sure all those are even.
The gasket kit, you get your choice, paper or metal? I'm going to use the paper ones. Colony fasteners going with our chromium theme on the fasteners. Wait a minute, that's an old one. Nevermind. Here we go. Finally, the other two from the other side.
Now, you want to move that centerpiece so that these are even right here. You want to get this line even right here, and you want this to be pretty much even and this one pretty much even. We'll go back. We've got those all even. We check the other side before we go ahead and final-tighten those down and that looks pretty good. We got all three of those even, we got this even, we're ready to tighten them down the rest of the way.
I'm drawing these down evenly. I'm not going to crank one side all the way down and then do the other side.
I go over them a couple of times so that I'm bringing them even, and you can feel when they're tight. I'm not really sure what the torque spec is on this. This is another calibrated elbow job. When you've done it a bunch of times, you know how tight they need to be. If you want to refer to the torque spec, that's fine. I don't really think that's necessary on these.
I go to go back over them, one last time on these two and I think we got her. Yes, that's good. I can feel it, beautiful. Nice and even. It's not the end of the world if it's not perfect, but it just looks bad if it's sticking out funny on one side or the other. There you have it on that one. Now, we're ready to go ahead and do the same thing here. All right, we're going to go ahead and put the rear rocker box on.
There's a couple of other notes on this rear one, a little bit different in the front. There's a lot less clearance here where you can get to all this. What we're going to do is we're going to go ahead and put the gasket on first, and then we're going to put the rocker box on, and I've taken two of the fasteners out because it's hard to get it in there with them in there. She's a tight fit.
We'll get those two in the right place. Look at that. See, that's exactly what I was talking about earlier. Look how my rocker arms are all weirded out. That'll never work. There we go. That's better. Now, what we're going to do is we're going to put the pushrod tubes in now because it's much easier to do it that way because there's so little clearance here that we wouldn't have been able to get the rocker box in with the pushrod tubes.
What you're going to do is you don't have the bolts in at all. You're going to just lift this up and drop it down in there like so, same for the other one like so. Once again, checking that. There we go. We'll go ahead and get those two started. All good. Go ahead and put our fasteners on the other side. All right. I forgot to mention that I put the pushrod tubes in initially without the rocker box, and then I rotated the engine to be sure that both the pushrods were at their lowest point.
Then I went ahead and put my gasket rocker box on and then I dropped the pushrod tubes down in the hole. I forgot to tell you that's the way I was doing it. I did rotate the engine to the correct position, so now we're at that point in time where we're starting to put all our of our fasteners in, and our pushrods are at their lowest point. Once again, the three little ones.
The rear one is a little more chAllenging, and you'll see here when we go to put the top lid on and the middle piece, we'll probably will be beeping some swearing out.
We've got all our fasteners in. We'll go ahead and start drawing her down. Once again going side to side, bringing it down even.
The wrench only works so far on this side till you start running into the rocker box. It works fine on this side because you're wide open here.
Coming down. Go ahead and snug down the other side.
I think it keeps hitting that wire, and that's making it change sides. There we go.
We've got all four or 5/16s fasteners snugged down.
Then there's that one.
This one's a little harder to get to. That's why I'm using a quarter-inch ratchet. Obviously, a three-eighths ratchet's is not going to fit in there, but once she's all the way down, we'll be able to get the torque wrench in there for the initial tightening.
Last but not least, the two-socket heads, one on each end on this side.
You can't get anything on that one. I used a long ball-end Allen to get on that one. If you don't have one, you can use a regular Allen wrench to get that one down. All fasteners in, all snugged up, time to torque her. Once again, we're going to go 15 to 18 on the 5/16s and 10 to 13 on the quarters.
Oops. I only had her at 15, let's bump her up and do it again, not a problem. She was almost all the way there anyway. It's only a couple of pounds, but we'll just go ahead and do it again. We got a little turn out of that one. I am going to the end of the torque spec. We did that one, that one, and finally, this one. There we go. I was going to the top of the spec. I wanted to be at 18. Now, we're going to drop her down to 13. There's 10, 12, 13. We are going to need another socket. We'll use the deep socket on this one. Last but not least, the sneaky one in here
I'm not getting a whole lot of turn out of this. I think we're just about there. One more time.
There she goes. We didn't have that one snugged down as hard as the other ones because it's so hard to get to. Then finally, the other two, the final two. On this one, I don't like to use the ball-end for the final tightening. I'm going to just grab a regular Allen wrench. That should do it. Once again, don't forget your middle gasket. Making sure it's in the groove. Now comes the fun part. Breather valve facing forward.
Install the new one. See if she's a tight one. Look at that. There she goes right on there. Sometimes that ring can be a real pain going on and off on the rear. You can plainly see there's not much room. I remember one of the comments when we fixed the rocker box leak the last time on the video, they're like, "Dohhh! You didn't show the hard one, the back one."
There you go. Everything looks good with our gaskets. Maybe I was bragging too much. Let's see if the top goes on easy. Then when you find that just-right combination, she goes in. I'm not taking it back off to show you that again. Get your four fasteners in the top. Don't forget your little paper washers. There goes another nice awesome clearance problem there, Mr. Harley Davidson.
We still got our ball-end Allen. We'll be utilizing that on the back one because she's a difficult-to-get-to with the frames right in the road. Once again, checking our alignment. I'm just bringing these down, but I'm not snugging them up yet because I want to double-check on the other side that I'm happy with the way this is lined up. Before it gets tight, you could still wiggle that middle one around a little bit.
That looks pretty good right there. We'll go ahead and snug these all the way down to the bottom and then we'll go back to the other side. Then you can see it's pulling. See when she's done, it's tight. Once again, I'm going to gradually pull it down a little at a time. Maybe a regular Allen wrench on this, then we better feel for how tight it is and using that really long ball-end. There you have it. She's looking pretty good now, looking like a motor again.
We'll go ahead and show you changing the intake manifold gaskets, which is very important. That top-end kit did not come with those. Anytime, if you've got that manifold off, it's a good idea to put new gaskets on there. You don't want an intake leak, that'll give you a lean running condition that's very hard to chase down. We'll show you the trick on getting it on there and getting it lined up for the rest of the parts to go on.
Before we get the manifold on, we're going to go ahead and throw a new set of spark plugs in there. We stock auto lights. The proper gap for this engine is 40,000s. I can see that's not 40,000s just by looking at it. We got this handy-dandy little tool here, courtesy of my awesome cameraman, he had this hanging on his belt. With this particular tool, you're just going to slide it up to the one choice.
Actually, you can bend it up a little to get there. You're going to get it to the 40,000s. I'm using two feeler gauges here, a 35 and a five. There she is, 40,000s. We already got this one when you weren't looking. 40,000s. Always use a little dab NICs on your new plugs on the threads, don't put it on the electrodes. Make sure you get some all over your hand because that's always fun. That'll keep the plug from galling in the cylinder head.
Even though the first time we go to take these out, they'll be coming up anyway. It's just a good practice. Put a little NICs on there. I couldn't find my 11/16 spark plug wrench, so we're just going to use this wrench. Don't overdo it on your plugs. You need them to be tight, but don't crank them till you rip the threads out of the cylinder heads. There we go. The spark plug is installed.
There's our manifold. Look at those little gaskets. Those don't look very happy. Now here's our new gaskets. You'll notice where I'll take one off, then you'll see. I'll show you, one sides beveled, the other side is not. The beveled side is going to face that bevel on there when they go back together. Let's not mix up the old ones and the new ones. That's an old one. These are the new ones.
I'm just going to pop it off of there, just push-fit like so. When we come back from-- we're going to go clean this thing off because it's grungy, but they're going to go back on the same way they came off. We'll go ahead and put those the way they came off, so we don't have to even think about it when we come back. We're going to have the part number up. This one's going to go here like that.
Let's go get this part-- We'll give it a quick bath, scrub it down. It's grungy. We'll get those seals on there. All right, we got it cleaned up a little better than it was before. Part number faces down. When it's on the engine, it's like this. One thing I didn't tell you a minute ago is these are marked front and rear. There's a little F on the front one and an R are on the rear one, imagine that.
Basically, you're just going to put your gasket on there. This one says R. You're just going to slide it on like so. See how that moves. I'll show you that in a sec here. You can just put this on first, either way, it doesn't matter. The gasket on, bevel facing. We'll show you that one more time. That part's beveled, that part's beveled. That goes on first. Flat side faces up. You'll notice these are all wonky donkey. We'll go put it on the engine then it'll make better sense.
We're ready to get our manifold installed. I like to put just a little dab of grease on the seals, like so. You see you've got these two slots on the opposite side and then this side gets the ball. You've got these two studs already installed in the cylinder heads. These are going to slide over that as you introduce the manifold to the cylinder heads, like so. Get her up in there like that.
That one, there she goes. You just want to go ahead and line up the other holes for the socket head fasteners. It's a tricky job. That son of a gun. There she goes. You got to get it all the way in the hole before it's going to start going in there. Get those in any way you can. Get both of your socket head ones started. I just put a little tiny bit of lube on the threads on those because they were drier than a popcorn fart. You want to position this.
Basically, this plane here has to be level with when you put the carb and the backing plate on. What we're going to do is we're just going to snug these down by hand. We're not going to final tighten them at this point. You'll see that this can move until it's completely tightened. You don't want to completely tighten it until you have gasket, carb, backing plate, all lines it all up.
What I usually do is I put those parts on temporarily and then I take them back off to tighten it. That's the correct way to do it because if you tighten this now, you may get your carb on and find out that when you go to put this on, your carburetor is up or down just a little bit. You want everything to fit nicely. We do need to snug up the other bolts a little bit with a half-inch wrench.
That's pushing the seals up against the head. That's what forms the seal. They're snugged up. I got the gasket installed on the manifold, we'll just go ahead and maybe tip a little bit of grease on this to get it to slide in there. Pop your carb on, making sure it's fully seated in the manifold and then straighten it because you can see if you can turn it this way, you can turn it that way.
All right, so we got our carb on there. We're going to utilize a gas box support bracket to get our alignment done. You can also use your stock backing plate. If we hold that up there we can say, "Oh my gosh, we don't even have to put the screws in the carb." We can see that the carb right now is too low. What you'll do is you'll just line it up. This is flat against there, and these are going to sit flat against that.
We could actually put a couple of breather bolts in there to aid in this job. These are Lowbrow Customs breather bolts. We will be using this on this project. I'm sure we already went over this a million times, but we'll do it again because we're doing this. See how it also is pushing the carb onto the manifold. You're going to move this so that the holes all line up nicely.
There's a little bit of play in the bracket but you can see now that this is flat up against the face of the carb, these are lining up. We don't have to tighten this stuff all the way down, but we can. See, it's actually moving it up a little more again. Now, the manifold is positioned correctly on the cylinder heads so that we can tighten it down. You can sneak in here with your ball in and snug those up.
The carb will be coming back off, but that's okay. We're just going to snug up those manifold bolts and then we'll go around the other side and tighten the half-inch ones. I started to say that anytime you are using an aftermarket air cleaner, you must have a support bracket with a CB carburetor because it's spigot-mounted. You saw we just push-fitted onto the manifold. If you didn't have a support bracket, there wouldn't be anything holding the carburetor on. Essentially, your carb could possibly fall right off your motorcycle, and that would suck.
You're going to go ahead and tighten those securely. What we're doing is, we're forming a seal with those new gaskets we put on there. Nice and tight. It's probably tight enough now. We'll go ahead and see if we can snug these just a little bit more. There we go. Then what we can do is, we can pop the carb off to tighten those other ones completely. There you have it. Manifolds installed.
We just need to tighten those other two completely. They're very difficult to get to with the carb on there unless-- I used to have a ball-end in a 3/8 drive where I could use my ratchet and just go down in there and crank them tight. It's not really that big of a deal. We do have some more work to do on this job here, so it's not a big deal to just pop this back off of there to fully tighten those.
Once again, stock backing plate. It would be a lot more difficult to get to those two bolts if you had the stock backing plate, but who uses the stock backing plates? Take your carb back off. Here's an Allen wrench I modified for this job. There's a few different ways to do this. You can see I've cut that off of the Whizzer wheel. Then you can get in there, maybe. Make sure that's fully engaged.
Get your cutoff wrench in there. There we go now. Now she's tight. You want to make sure all four of those fasteners are nice and tight. Now you can see that our manifold is lined up, so when we go to finish our final assembly, everything will fit perfectly. All right, gang, that concludes our S&S hooligan kit installation. I know what you're thinking, we're not done yet. Yes, we do have a little ways to go. We do have some future plans for this little project here. Stay tuned for some other videos on some other stuff we're going be doing with the same motorcycle. When she's all done at the end, we'll show you some video of this fine engine running and ripping around town. Hope you enjoyed. Whooo.

Related Products


